Creating Virtual Machine Templates in Azure DevTest Labs
Question
SIMULATION -
You need to create a virtual machine template in an Azure DevTest Labs environment named az400-9940427-dtl1. The template must be based on Windows
Server 2019 Datacenter. Virtual machines created from the template must include the selenium tool and the Google Chrome browser.
To complete this task, sign in to the Microsoft Azure portal.
Explanations
See explanation below.
1. Open Microsoft Azure Portal
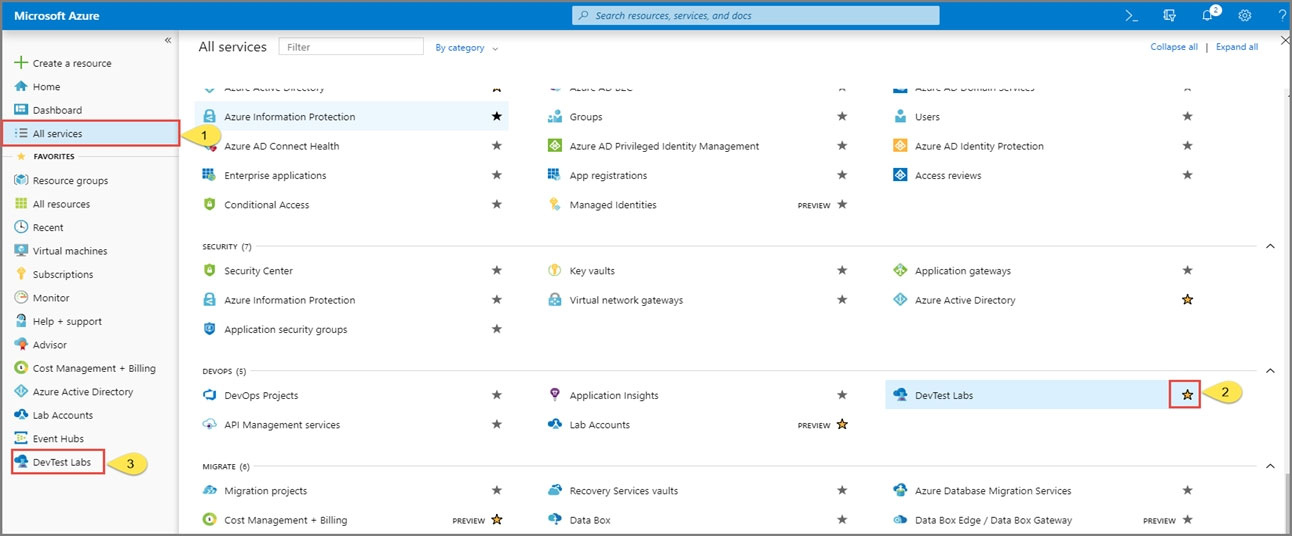
2. Select All Services, and then select DevTest Labs in the DEVOPS section.

3. From the list of labs, select the az400-9940427-dtl1 lab
4. On the home page for your lab, select + Add on the toolbar.
5. Select the Windows Server 2019 Datacenter base image for the VM.
6. Select automation options at the bottom of the page above the Submit button.
7. You see the Azure Resource Manager template for creating the virtual machine.
8. The JSON segment in the resources section has the definition for the image type you selected earlier.
https://docs.microsoft.com/bs-cyrl-ba/azure//lab-services/devtest-lab-vm-powershellSure, I can walk you through the process of creating a virtual machine template in Azure DevTest Labs environment based on Windows Server 2019 Datacenter and includes the selenium tool and Google Chrome browser.
Here are the steps to follow:
Sign in to the Microsoft Azure portal (https://portal.azure.com/) using your credentials.
In the search bar at the top of the Azure portal, type "DevTest Labs" and select the DevTest Labs service from the results.
In the DevTest Labs blade, select the lab named "az400-9940427-dtl1" where you want to create the virtual machine template.
In the lab blade, select the "Virtual machines" option from the menu on the left-hand side.
Click on the "Add" button at the top of the Virtual machines blade and select "From gallery".
In the "Create a virtual machine" blade, select the "Windows Server 2019 Datacenter" image from the list of available images.
Fill in the required details such as Name, Subscription, Resource group, Virtual network, and Subnet as per your lab environment configuration.
Scroll down to the "Settings" section of the "Create a virtual machine" blade and select the "Extensions" tab.
Click on the "Add extension" button to add a new extension.
In the "Add an extension" blade, select "Custom Script Extension" from the list of available extensions and click on the "Create" button.
In the "Custom Script Extension" blade, provide the following details:
Script File URI: Enter the URI of the script that installs Selenium and Google Chrome. You can use a script that you have created or use the following sample script:
powershell$url = "https://dl.google.com/chrome/install/standalone/GoogleChromeStandaloneEnterprise64.msi" $path = "C:\Windows\Temp\Chrome.msi" $seleniumUrl = "https://selenium-release.storage.googleapis.com/3.141/selenium-server-standalone-3.141.59.jar" $seleniumPath = "C:\Windows\Temp\selenium-server-standalone.jar" (New-Object System.Net.WebClient).DownloadFile($url, $path) (New-Object System.Net.WebClient).DownloadFile($seleniumUrl, $seleniumPath) Start-Process msiexec.exe -ArgumentList '/i C:\Windows\Temp\Chrome.msi /quiet /norestart' -WaitArguments: Leave this field blank.
Version: Leave this field as the default.
Click on the "OK" button to add the extension to the virtual machine.
Back in the "Settings" section of the "Create a virtual machine" blade, select the "Disks" tab.
Configure the storage settings as per your requirements and click on the "OK" button.
Review the summary and click on the "Create" button to create the virtual machine template.
Once the virtual machine template is created, you can use it to create new virtual machines in your DevTest Labs environment that include the Selenium tool and Google Chrome browser.