Protecting Against SQL Injection in Azure SQL Database
Question
SIMULATION -
You manage a website that uses an Azure SQL Database named db1 in a resource group named RG1lod11566895.
You need to modify the SQL database to protect against SQL injection.
To complete this task, sign in to the Microsoft Azure portal.
Explanations
See explanation below.
Set up Advanced Threat Protection in the Azure portal
1. Sign into the Azure portal.
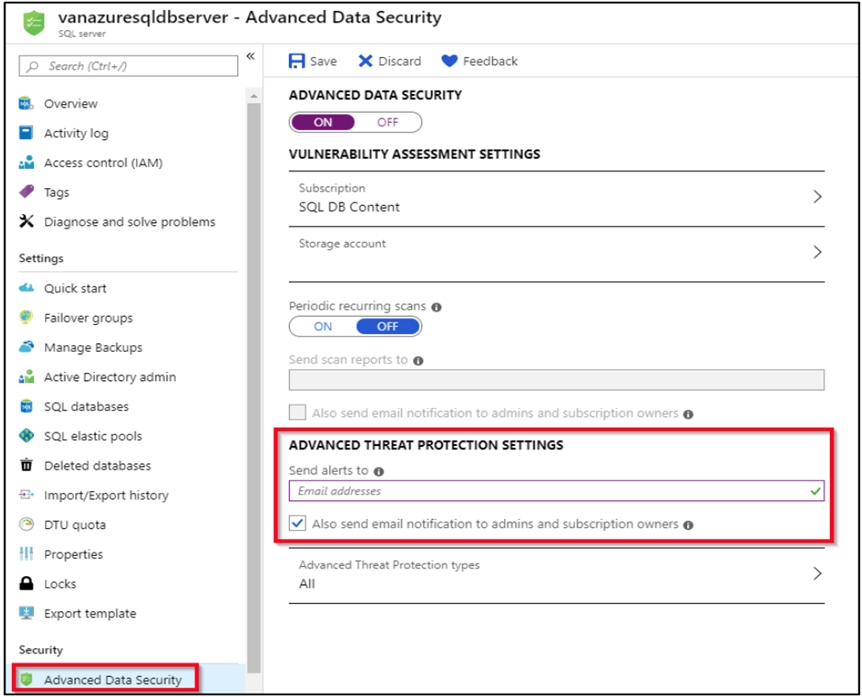
2. Navigate to the configuration page of the server you want to protect. In the security settings, select Advanced Data Security.
3. On the Advanced Data Security configuration page:

4. Enable Advanced Data Security on the server.
Note: Advanced Threat Protection for Azure SQL Database detects anomalous activities indicating unusual and potentially harmful attempts to access or exploit databases. Advanced Threat Protection can identify Potential SQL injection, Access from unusual location or data center, Access from unfamiliar principal or potentially harmful application, and Brute force SQL credentials
https://docs.microsoft.com/en-us/azure/storage/common/storage-account-create https://docs.microsoft.com/en-us/azure/azure-sql/database/threat-detection-configureTo modify the SQL database to protect against SQL injection, you can follow these steps:
Sign in to the Azure portal using your credentials.
Locate the resource group named "RG1lod11566895" where the Azure SQL Database is located.
Click on the resource group and select the Azure SQL Database named "db1" from the list of resources.
Under the "Settings" section, select the "Firewalls and virtual networks" option.
In the "Firewalls and virtual networks" blade, enable the "Allow access to Azure services" option to allow traffic from Azure services to access the database.
You can also add specific IP addresses or IP ranges that are allowed to access the database. To do this, click on the "Add client IP" button and provide the required information.
Next, select the "Auditing & Threat detection" option from the left-hand menu.
Enable the "Threat detection" feature by clicking on the toggle button.
Configure the "Threat detection settings" by selecting the types of threats that you want to detect and the email addresses where alerts will be sent.
Click on the "Save" button to save the changes.
By following these steps, you have modified the SQL database to protect against SQL injection by enabling firewalls and virtual networks and configuring threat detection.
