Preventing Accidental Deletion and Regular Subnet Addition in Azure VNET2
Question
SIMULATION -
You need to configure a virtual network named VNET2 to meet the following requirements:
-> Administrators must be prevented from deleting VNET2 accidentally.
-> Administrators must be able to add subnets to VNET2 regularly.
To complete this task, sign in to the Azure portal and modify the Azure resources.
Explanations
See the explanation below.
Locking prevents other users in your organization from accidentally deleting or modifying critical resources, such as Azure subscription, resource group, or resource.
Note: In Azure, the term resource refers to an entity managed by Azure. For example, virtual machines, virtual networks, and storage accounts are all referred to as Azure resources.
1. In the Azure portal, type Virtual Networks in the search box, select Virtual Networks from the search results then select VNET2. Alternatively, browse to
Virtual Networks in the left navigation pane.
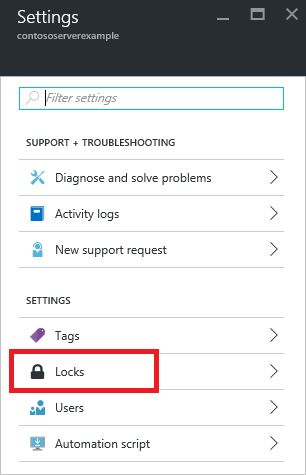
2. In the Settings blade for virtual network VNET2, select Locks.

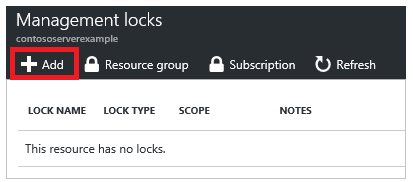
3. To add a lock, select Add.

4. For Lock type select Delete lock, and click OK
https://docs.microsoft.com/en-us/azure/azure-resource-manager/resource-group-lock-resourcesTo configure VNET2 with the requirements mentioned in the question, follow these steps:
Sign in to the Azure portal (https://portal.azure.com/).
In the left-hand menu, click on "Virtual networks" under the "Networking" section.
Click on the name of the virtual network you want to modify (in this case, VNET2).
Click on the "Subnets" option under the "Settings" section.
Click on the "+" button to add a new subnet.
In the "Name" field, enter a name for the new subnet.
In the "Address range" field, enter the IP address range for the new subnet.
Click on the "Add" button to create the new subnet.
To prevent accidental deletion of VNET2, you can assign a role to the administrator that only allows them to add subnets to the virtual network. To do this, navigate to the "Access control (IAM)" section under the "Settings" menu for VNET2.
Click on the "Add" button and select "Add role assignment" from the dropdown menu.
In the "Role" field, select "Contributor".
In the "Assign access to" field, select "User, group, or service principal".
In the "Select" field, enter the name of the administrator you want to assign the role to.
Click on the "Save" button to assign the role.
Now, the administrator can add subnets to VNET2 regularly, but they will not be able to delete the virtual network accidentally.
