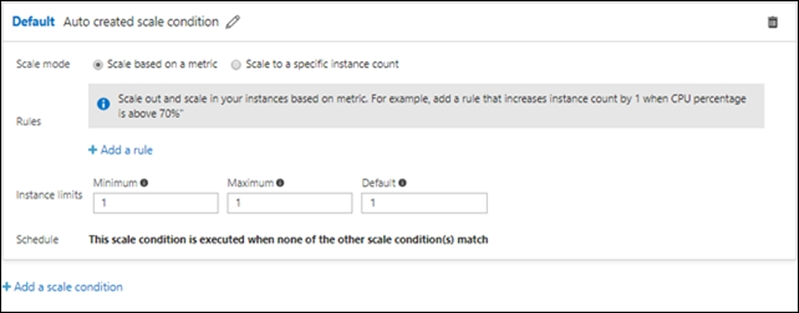
Add additional instances of Azure Web App when CPU exceeds 70% for 10 minutes
Question
DRAG DROP -
You are developing an Azure web app named WebApp1. WebApp1 uses an Azure App Service plan named Plan1 that uses the B1 pricing tier.
You need to configure WebApp1 to add additional instances of the app when CPU usage exceeds 70 percent for 10 minutes.
Which three actions should you perform in sequence? To answer, move the appropriate actions from the list of actions to the answer area and arrange them in the correct order.
Select and Place:
Explanations
Explanation
Box 1: From the Scale out (App Service Plan) settings blade, change the pricing tier
The B1 pricing tier only allows for 1 core. We must choose another pricing tier.
Box 2: From the Scale out (App Service Plan) settings blade, enable autoscale
1. Log in to the Azure portal at http://portal.azure.com
2. Navigate to the App Service you would like to autoscale.
3. Select Scale out (App Service plan) from the menu
4. Click on Enable autoscale. This activates the editor for scaling rules.

Box 3: From the Scale mode to Scale based on metric, add a rule, and set the instance limits.
Click on Add a rule. This shows a form where you can create a rule and specify details of the scaling.
https://azure.microsoft.com/en-us/pricing/details/app-service/windows/ https://blogs.msdn.microsoft.com/hsirtl/2017/07/03/autoscaling-azure-web-apps/To configure Azure web app WebApp1 to add additional instances when CPU usage exceeds 70 percent for 10 minutes, you need to perform the following three actions in sequence:
Create an alert rule: Create an alert rule to monitor the CPU usage of WebApp1. To create an alert rule, navigate to the Azure portal, select the WebApp1 resource, and then select the "Alerts" option. In the "Alerts" pane, click on "New alert rule" to create a new alert rule. Set the rule conditions to monitor CPU usage of WebApp1 and configure the threshold to 70% for 10 minutes.
Create an action group: Create an action group to specify the actions that should be taken when the alert rule is triggered. To create an action group, navigate to the Azure portal, select the WebApp1 resource, and then select the "Action groups" option. In the "Action groups" pane, click on "New action group" to create a new action group. Specify the actions that should be taken when the alert rule is triggered, such as adding additional instances of the app.
Enable autoscale: Enable autoscale on the App Service plan (Plan1) to add additional instances of the app when the alert rule is triggered. To enable autoscale, navigate to the Azure portal, select the Plan1 resource, and then select the "Scale out (App Service Plan)" option. In the "Scale out" pane, click on "Add a rule" to create a new autoscale rule. Configure the rule to add additional instances of the app when the alert rule is triggered.
Once you have completed all three actions in the correct sequence, your Azure web app WebApp1 will be configured to add additional instances when CPU usage exceeds 70 percent for 10 minutes.