Question 38 of 239 from exam AZ-300: Microsoft Azure Architect Technologies
Question
SIMULATION -
Click to expand each objective. To connect to the Azure portal, type https://portal.azure.com in the browser address bar.
When you are finished performing all the tasks, click the "Next' button.
Note that you cannot return to the lab once you click the "Next' button. Scoring occur in the background while you complete the rest of the exam.
Overview -
The following section of the exam is a lab. In this section, you will perform a set of tasks in a live environment. While most functionality will be available to you as it would be in a live environment, some functionality (e.g., copy and paste, ability to navigate to external websites) will not be possible by design.
Scoring is based on the outcome of performing the tasks stated in the lab. In other words, it doesn't matter how you accomplish the task, if you successfully perform it, you will earn credit for that task.
Labs are not timed separately, and this exam may have more than one lab that you must complete. You can use as much time as you would like to complete each lab. But, you should manage your time appropriately to ensure that you are able to complete the lab(s) and all other sections of the exam in the time provided.
Please note that once you submit your work by clicking the Next button within a lab, you will NOT be able to return to the lab.
To start the lab -
You may start the lab by clicking the Next button.
You plan to allow connections between the VNET01-USEA2 and VNET01-USWE2 virtual networks.
You need to ensure that virtual machines can communicate across both virtual networks by using their private IP address.
The solution must NOT require any virtual network gateways.
What should you do from the Azure portal?
Explanations
See explanation below.
Virtual network peering enables you to seamlessly connect two Azure virtual networks. Once peered, the virtual networks appear as one, for connectivity purposes.
Peer virtual networks -
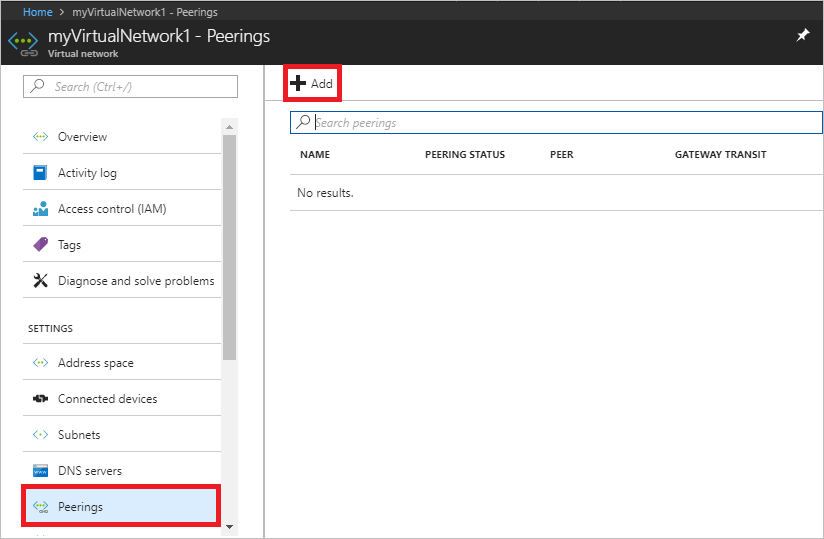
Step 1. In the Search box at the top of the Azure portal, begin typing VNET01-USEA2. When VNET01-USEA2 appears in the search results, select it.
Step 2. Select Peerings, under SETTINGS, and then select + Add, as shown in the following picture:
Step 3. Enter, or select, the following information, accept the defaults for the remaining settings, and then select OK.
Name: myVirtualNetwork1-myVirtualNetwork2 (for example)
Subscription: elect your subscription.
Virtual network: VNET01-USWE2 - To select the VNET01-USWE2 virtual network, select Virtual network, then select VNET01-USWE2. You can select a virtual network in the same region or in a different region.
Now we need to repeat steps 1-3 for the other network VNET01-USWE2:
Step 4. In the Search box at the top of the Azure portal, begin typing VNET01- USEA2. When VNET01- USEA2 appears in the search results, select it.
Step 5. Select Peerings, under SETTINGS, and then select + Add.
https://docs.microsoft.com/en-us/azure/virtual-network/tutorial-connect-virtual-networks-portal