App10598168 Azure AD Registration and Password Generation
Question
SIMULATION -
The developers at your company plan to create a web app named App10598168 and to publish the app to https://www.contoso.com.
You need to perform the following tasks:
-> Ensure that App10598168 is registered to Azure Active Directory (Azure AD).
-> Generate a password for App10598168.
To complete this task, sign in to the Azure portal.
Explanations
See the explanation below.
Step 1: Register the Application
1. Sign in to your Azure Account through the Azure portal.
2. Select Azure Active Directory.
3. Select App registrations.
4. Select New registration.
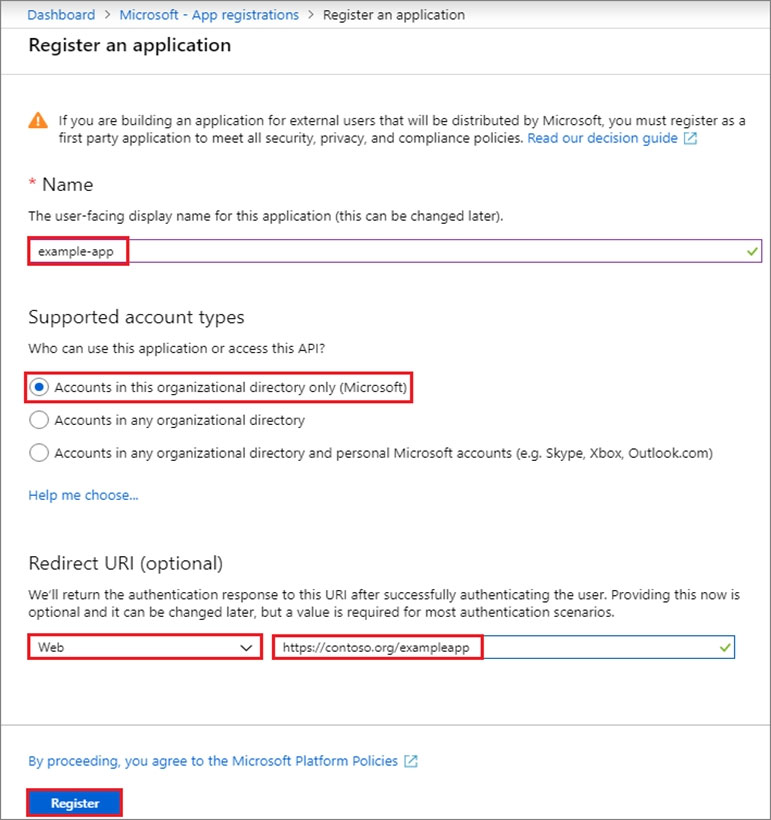
5. Name the application App10598168 . Select a supported account type, which determines who can use the application. Under Redirect URI, select Web for the type of application you want to create. Enter the URI: https://www.contoso.com , where the access token is sent to.

6. Click Register
Step 2: Create a new application secret
If you choose not to use a certificate, you can create a new application secret.
7 Select Certificates & secrets.
8. Select Client secrets -> New client secret.
9. Provide a description of the secret, and a duration. When done, select Add.
After saving the client secret, the value of the client secret is displayed. Copy this value because you aren't able to retrieve the key later. You provide the key value with the application ID to sign in as the application. Store the key value where your application can retrieve it.
https://docs.microsoft.com/en-us/azure/active-directory/develop/howto-create-service-principal-portalTo register a web app in Azure Active Directory (Azure AD) and generate a password for the app, follow these steps:
Sign in to the Azure portal (https://portal.azure.com/) with your Azure account credentials.
Click on the "Azure Active Directory" icon from the left-hand side menu.
Click on the "App registrations" option from the Azure AD menu.
Click on the "New registration" button at the top of the App registrations screen.
In the "Register an application" page, provide a name for the web app in the "Name" field (e.g. App10598168).
Under "Supported account types," select the option that best fits the intended use of your app (e.g. "Accounts in this organizational directory only").
In the "Redirect URI" section, select the type of redirect URI to be used by the app (e.g. "Web" for a web application) and enter the redirect URI in the "Redirect URI" field. The redirect URI is the URI to which Azure AD will send the authentication response after the user has successfully authenticated.
Click on the "Register" button to create the web app.
Once the app is created, you'll be redirected to the app's overview page. From this page, you can see the "Application (client) ID," which is a unique identifier for the app in Azure AD.
To generate a password for the app, click on the "Certificates & secrets" option from the left-hand side menu.
In the "Client secrets" section, click on the "New client secret" button.
In the "Add a client secret" dialog box, enter a description for the client secret in the "Description" field.
Select an expiration option for the client secret (e.g. "In 1 year").
Click on the "Add" button to create the client secret.
Once the client secret is created, you'll be redirected to the "Certificates & secrets" screen, where you can see the client secret value. Make sure to copy the value and save it in a secure location, as you won't be able to retrieve it again once you leave this page.
That's it! You have now registered the web app in Azure AD and generated a password (client secret) for it.